26.1 Chapter Objective
In the previous chapter, we defined the implementation architecture.
Now we start building.
The target for this chapter is not to build the entire ACAI platform at once.
The target is:
EMPTY FOLDER
     ↓
NEXT.JS APPLICATION
     ↓
UI
     ↓
ENVIRONMENT
     ↓
AI GATEWAY
     ↓
CHAT API
     ↓
CHAT UI
     ↓
RUN
     ↓
TEST
     ↓
FIRST WORKING ACAI
Once this foundation works, later chapters can add:
RAG
Agent
Tools
Image Generation
Video Generation
Memory
Storage
Workers
Billing
Monitoring
26.2 Prerequisites
The development computer should have:
Windows
Node.js
npm
VS Code
Internet connection
Git (recommended)
Verify Node.js:
node -v
Verify npm:
npm -v
If both commands return version numbers, continue.
26.3 Create the Project Folder
Choose a workspace location.
Example:
D:\ACAI
Open PowerShell or the VS Code terminal inside that location.
Then create the application.
The important rule is:
DO NOT RUN npm COMMANDS
FROM THE WRONG DIRECTORY.
Before installing packages, verify that the terminal is inside the ACAI project directory.
26.4 Create the Next.js Application
Create the project using the current Next.js project generator.
Recommended configuration:
TypeScript       → Yes
ESLint           → Yes
Tailwind CSS     → Yes
App Router       → Yes
src/ directory   → Yes
Use the project generator rather than manually assembling a Next.js project from dozens of packages.
After creation:
ACAI
├── src
├── public
├── package.json
├── tsconfig.json
└── ...
26.5 First Run
Before changing anything:
npm run dev
The development server should start.
Open the local address shown by the terminal.
Expected:
Browser
   ↓
ACAI Next.js application
If the default Next.js page appears:
✓ PROJECT WORKS
Stop here only if an error appears.
26.6 Do Not Continue With a Broken Project
If you see:
npm ERR!
next is not recognized
package.json not found
module not found
do not start adding more code.
First fix:
Directory
 ↓
Node.js
 ↓
npm install
 ↓
Project
Then run again.
This prevents later problems from becoming much harder to diagnose.
26.7 Open the Project in VS Code
Open the ACAI folder in VS Code.
The basic structure should look similar to:
ACAI
│
├── src
│   └── app
│
├── public
│
├── package.json
├── tsconfig.json
├── next.config.*
└── ...
The exact generated files can differ depending on the Next.js version and selected options.
26.8 Create the Application Layout
The application will eventually contain:
src/
├── app/
├── components/
├── lib/
├── services/
├── types/
└── config/
Create these directories gradually.
Do not create hundreds of empty files just to match an architecture diagram.
26.9 Application Pages
The first useful pages are:
/
 /dashboard
 /chat
 /documents
 /image
 /video
 /settings
For Chapter 26, only these are essential:
/
 /chat
The remaining pages can be added later.
26.10 Create the ACAI Homepage
Replace the initial homepage with a simple ACAI landing interface.
The objective is:
ACAI
Your AI Creative Intelligence Platform
and a button:
Open AI Chat
The button should navigate to:
/chat
26.11 Basic Chat Page
The first chat page needs only:
Header
Message area
Input
Send button
Loading state
Error state
Conceptually:
┌──────────────────────────────────────────────┐
│ ACAI                                         │
├──────────────────────────────────────────────┤
│                                              │
│  AI: Hello. How can I help?                 │
│                                              │
│  You: Explain artificial intelligence.      │
│                                              │
│  AI: Artificial intelligence is...          │
│                                              │
├──────────────────────────────────────────────┤
│ Ask ACAI...                         [Send]   │
└──────────────────────────────────────────────┘
26.12 Frontend State
The chat component needs basic state:
messages
input
loading
error
Conceptually:
messages = []
input = ""
loading = false
error = null
When the user sends a message:
input
 ↓
messages
 ↓
API request
 ↓
assistant response
 ↓
messages
26.13 Create the AI Library
Create:
src/lib/ai/
The purpose is to prevent AI-provider logic from being scattered across the application.
Instead of:
Chat UI
 ↓
Provider SDK
use:
Chat UI
 ↓
API
 ↓
AI Gateway
 ↓
Provider
26.14 AI Gateway
Create a server-side AI gateway module.
Conceptual responsibility:
generate()
stream()
selectModel()
handleErrors()
The first implementation can contain only one provider.
Later:
Provider A
Provider B
Provider C
Local Model
can be connected.
26.15 Why the Gateway Matters
Without a gateway:
CHAT
 ↓
PROVIDER A

IMAGE
 ↓
PROVIDER A

AGENT
 ↓
PROVIDER A

RAG
 ↓
PROVIDER A
Changing providers becomes difficult.
With a gateway:
CHAT
      \
IMAGE  \
AGENT   → AI GATEWAY → PROVIDER
RAG    /
The rest of the application remains more independent from provider-specific code.
26.16 Environment Variables
Create the local environment file expected by your selected provider configuration.
Typical structure:
AI_API_KEY=your_key_here
The exact variable name should match the implementation.
Important:
.env.local
should not be committed to Git if it contains secrets.
26.17 Never Put Secret Keys in the Browser
Incorrect:
React Component
 ↓
API SECRET
Correct:
React Component
 ↓
Your API
 ↓
Server
 ↓
AI Provider
The browser only knows your application endpoint.
26.18 Server-Side AI Request
The basic server flow:
POST /api/chat
       │
       ▼
Validate request
       │
       ▼
Get message
       │
       ▼
AI Gateway
       │
       ▼
Provider
       │
       ▼
Return response
26.19 Chat API
Create the API route under:
src/app/api/chat/
The endpoint should accept something conceptually similar to:
{
  "message": "Hello ACAI"
}
The server should validate that:
message exists
message is a string
message is not empty
message is within the permitted size
26.20 API Response
A successful response can have a normalized structure:
{
  "message": "Hello! How can I help you?"
}
A production implementation can later include:
requestId
model
usage
metadata
26.21 Error Response
Do not expose provider internals.
Instead of returning:
internal SDK stack trace
return something like:
{
  "error": "Unable to generate a response."
}
and log the detailed error on the server.
26.22 Frontend → API
When the user presses Send:
CHAT INPUT
 ↓
fetch("/api/chat")
 ↓
POST
 ↓
JSON
 ↓
SERVER
The server returns:
JSON
 ↓
CHAT UI
 ↓
ASSISTANT MESSAGE
26.23 Loading State
During generation:
[Send]
changes to:
[Generating...]
or:
AI is thinking...
The user should not be able to accidentally send the same request repeatedly while the request is still processing.
26.24 Empty Input
If:
input = ""
then:
SEND
 ↓
DO NOTHING
The frontend should prevent unnecessary API calls.
The server should also validate the input.
Never depend only on frontend validation.
26.25 Error State
If the AI request fails:
AI REQUEST
 ↓
ERROR
 ↓
SHOW USER-FRIENDLY MESSAGE
Example:
Unable to generate a response right now.
Please try again.
26.26 First Working Request
The first test should be extremely simple:
User:
Hello
Expected:
ACAI:
Hello! How can I help you?
If this works:
✓ Frontend
✓ API
✓ AI Gateway
✓ Provider
are connected.
26.27 Add Request Logging
During development, log only useful diagnostic information.
For example:
request received
AI request started
AI request completed
Avoid logging:
API keys
Passwords
Private tokens
Sensitive user data
26.28 Request ID
Generate an identifier for important requests.
Conceptually:
REQUEST
 ↓
requestId
 ↓
API
 ↓
AI Gateway
 ↓
LOG
If something fails, the request ID helps connect the frontend error with server logs.
26.29 Add Timeout Handling
An AI provider may become slow or unavailable.
Therefore:
REQUEST
 ↓
TIME LIMIT
 ↓
SUCCESS
or:
REQUEST
 ↓
TIME LIMIT EXCEEDED
 ↓
CONTROLLED ERROR
Never allow requests to hang indefinitely.
26.30 Retry Carefully
Temporary failures may sometimes be retried.
REQUEST
 ↓
TEMPORARY FAILURE?
 ├── NO → RETURN ERROR
 └── YES
       ↓
     RETRY
Do not blindly retry every error.
For example:
invalid API key
does not become fixed by repeated retries.
26.31 Basic Model Configuration
The application should have one central place for the selected model.
Conceptually:
MODEL = "selected-model"
Do not hard-code the model name across ten different files.
26.32 Provider Abstraction
Later, the gateway can become:
AI Gateway
│
├── Provider A
├── Provider B
├── Provider C
└── Local Provider
The application calls:
generate()
rather than knowing the internal provider implementation.
26.33 Local Model Option
If a local model server such as Ollama is later used:
ACAI
 ↓
AI GATEWAY
 ↓
LOCAL MODEL SERVER
 ↓
MODEL
This can be useful for development or privacy-sensitive workloads, but it requires appropriate local hardware and model availability.
26.34 Cloud Model Option
Cloud architecture:
ACAI
 ↓
AI GATEWAY
 ↓
CLOUD PROVIDER
 ↓
MODEL
The provider's API key stays on the server.
26.35 Hybrid Architecture
Eventually ACAI can support:
                    AI GATEWAY
                        │
             ┌──────────┼──────────┐
             ▼          ▼          ▼
          LOCAL       CLOUD A    CLOUD B
          MODEL
Routing can depend on:
Task
Cost
Latency
Privacy
Availability
Model capability
26.36 First Database Integration
After basic chat works, add persistence.
The database needs at least:
User
Conversation
Message
For the very first prototype, authentication can be temporarily omitted.
But production chat must associate data with an authenticated user.
26.37 Conversation Flow With Database
The new flow becomes:
USER
 ↓
CHAT UI
 ↓
API
 ↓
SAVE USER MESSAGE
 ↓
AI GATEWAY
 ↓
MODEL
 ↓
SAVE AI MESSAGE
 ↓
RETURN
26.38 Conversation History
When the user returns:
LOGIN
 ↓
OPEN CHAT
 ↓
LOAD CONVERSATION
 ↓
DISPLAY HISTORY
The conversation is no longer lost when the browser refreshes.
26.39 Database Ownership
Every private conversation should have an owner.
Conceptually:
conversation.userId
Then:
REQUEST
 ↓
AUTHENTICATED USER
 ↓
CONVERSATION USER ID
 ↓
MATCH?
 ├── YES → ALLOW
 └── NO → DENY
26.40 Authentication Comes Before Production
The development sequence can be:
Prototype
 ↓
Basic chat
 ↓
Database
 ↓
Authentication
 ↓
Authorization
But before public production:
Authentication
+
Authorization
must be fully implemented.
26.41 First Milestone
At the end of this stage, the application should achieve:
[✓] Next.js runs
[✓] ACAI homepage
[✓] Chat page
[✓] Chat input
[✓] API endpoint
[✓] AI gateway
[✓] Provider connection
[✓] AI response
[✓] Loading state
[✓] Error handling
This is the first real milestone.
26.42 Debugging Method
If the chat does not work, test in this exact order:
1. Is Next.js running?
       ↓
2. Does /chat open?
       ↓
3. Does Send trigger the API?
       ↓
4. Does /api/chat receive the request?
       ↓
5. Is the environment variable loaded?
       ↓
6. Can the server reach the provider?
       ↓
7. Does the provider return a response?
       ↓
8. Does the API return JSON?
       ↓
9. Does the UI display it?
Do not randomly change five files.
26.43 Common Windows Problem
If PowerShell reports that scripts cannot run, the problem may be the PowerShell execution policy rather than npm itself.
The correct approach is to understand which shell is being used and adjust the development environment appropriately rather than repeatedly reinstalling Node.js.
The important distinction is:
Node.js installed
≠
PowerShell configured correctly
26.44 Common Directory Problem
If npm reports:
ENOENT
package.json not found
check:
pwd
or the current directory shown by your terminal.
You must be inside:
ACAI
where:
package.json
exists.
26.45 Common Dependency Problem
If a package cannot be found:
No matching version found
do not blindly copy an old version number from another tutorial.
First determine:
Current package version
Current framework version
Compatible dependency version
Then install the compatible package.
26.46 Common Port Problem
If port 3000 is already occupied:
Port 3000
 ↓
already in use
you can either:
stop the existing process
or run the development server on another available port.
The important point is that the application itself is not necessarily broken.
26.47 Git Initialization
Once the basic application works:
git init
Then create the first commit after ensuring secrets are excluded.
Typical structure:
CODE
 ↓
GIT
 ↓
COMMIT
Do not commit:
.env.local
API keys
private credentials
26.48 First Development Checkpoint
Create a checkpoint:
ACAI CHECKPOINT 01
Meaning:
Project runs
Homepage works
Chat page works
AI request works
If a later change breaks something, you know the last known working state.
26.49 What We Have Built
The architecture has now moved from:
IDEA
to:
RUNNING NEXT.JS APP
and then:
RUNNING AI CHAT
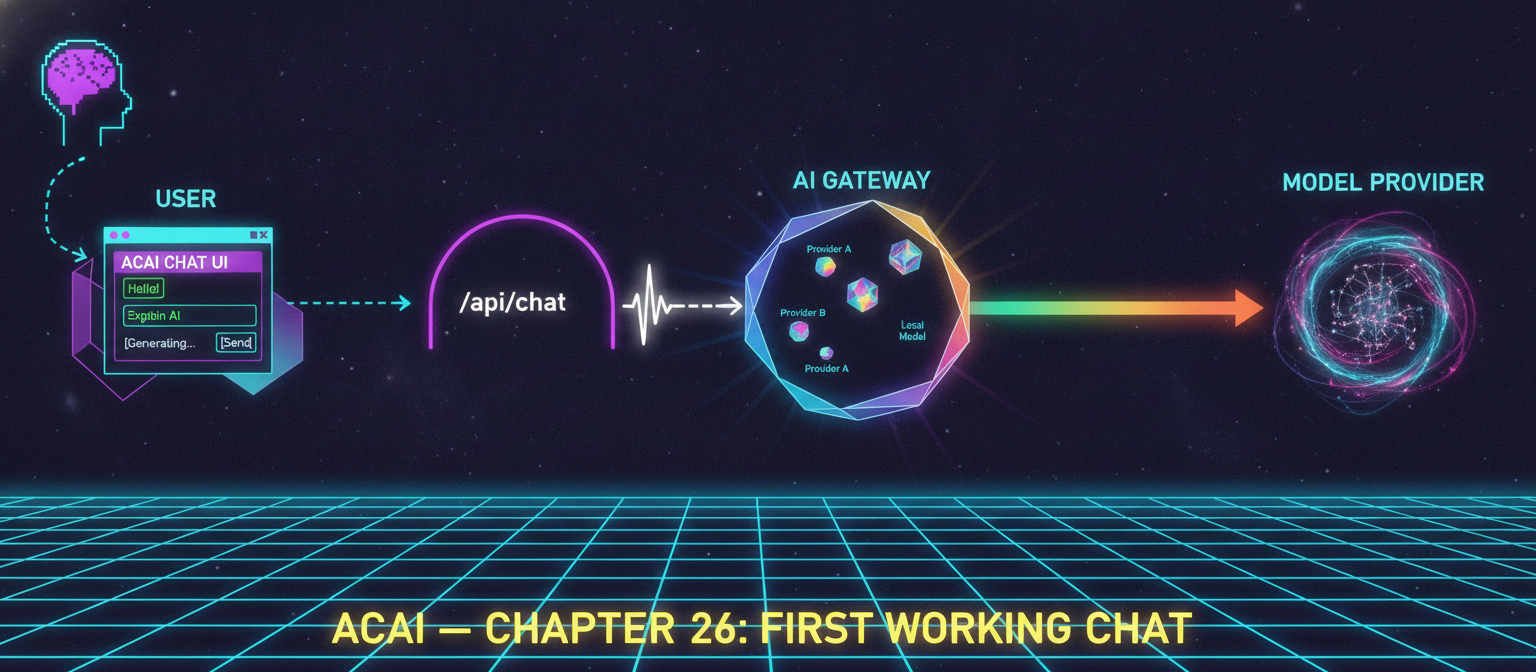
The first real data flow is:
USER
 ↓
ACAI CHAT UI
 ↓
/api/chat
 ↓
AI GATEWAY
 ↓
MODEL PROVIDER
 ↓
RESPONSE
 ↓
ACAI CHAT UI
That is the foundation for everything else.
26.50 What Comes Next
The next implementation stage should add persistent infrastructure:
DATABASE
+
AUTHENTICATION
+
CONVERSATION HISTORY
Then:
USER
 ↓
LOGIN
 ↓
DASHBOARD
 ↓
CHAT
 ↓
DATABASE
 ↓
AI
After that:
DOCUMENT UPLOAD
 ↓
STORAGE
 ↓
PROCESSING
 ↓
EMBEDDINGS
 ↓
VECTOR DATABASE
 ↓
RAG
Then:
AGENT
 ↓
TOOLS
 ↓
MEMORY
Finally:
IMAGE
VIDEO
WORKERS
QUEUE
BILLING
MONITORING
DEPLOYMENT
26.51 Complete Implementation Roadmap
CHAPTER 26
First Working Chat
        ↓
CHAPTER 27
Database + Authentication
        ↓
CHAPTER 28
Conversation History + User Dashboard
        ↓
CHAPTER 29
File Upload + Storage
        ↓
CHAPTER 30
Document Processing
        ↓
CHAPTER 31
Embeddings + Vector Database
        ↓
CHAPTER 32
Complete RAG
        ↓
CHAPTER 33
Agent Architecture
        ↓
CHAPTER 34
Tool System
        ↓
CHAPTER 35
Memory
        ↓
CHAPTER 36
Image AI
        ↓
CHAPTER 37
Video AI
        ↓
CHAPTER 38
Background Jobs + Workers
        ↓
CHAPTER 39
Usage + Billing
        ↓
CHAPTER 40
Security Hardening
        ↓
CHAPTER 41
Testing
        ↓
CHAPTER 42
Production Deployment
        ↓
CHAPTER 43
Monitoring + Scaling
26.52 Final Chapter Result
The key achievement of Chapter 26 is:
EMPTY FOLDER
       ↓
NEXT.JS
       ↓
ACAI UI
       ↓
CHAT PAGE
       ↓
API
       ↓
AI GATEWAY
       ↓
MODEL
       ↓
RESPONSE
This is the first real working vertical slice of ACAI.
Do not move to advanced agent, RAG, media generation, or large-scale infrastructure until this basic path is stable.
26.53 Chapter 26 Success Criteria
[✓] Project created
[✓] Next.js configured
[✓] TypeScript enabled
[✓] Tailwind enabled
[✓] Homepage created
[✓] Chat page created
[✓] API route planned
[✓] AI gateway created conceptually
[✓] Server-side secret handling
[✓] Input validation
[✓] Error handling
[✓] Loading state
[✓] Request logging
[✓] Request ID concept
[✓] Timeout concept
[✓] Provider abstraction
[✓] First AI response
[✓] Development checkpoint
[✓] Debugging workflow
26.54 End of Chapter 26
The next chapter is:
Chapter 27 — Database + Authentication + Real User Accounts + Persistent Conversations
The implementation will connect:
USER
 ↓
SIGN UP / LOGIN
 ↓
SESSION
 ↓
DASHBOARD
 ↓
CHAT
 ↓
DATABASE
 ↓
CONVERSATION
 ↓
MESSAGE HISTORY
After Chapter 27, ACAI will have a proper user/account foundation instead of being only a single-user prototype.
END OF CHAPTER 26


Comments
Post a Comment